 Better late than never, and I hope you find it worth waiting for...
Today's tutorial is to create a simple, whimsical raised work face. I don't often do this sort of 'cartoon' look, so it was an interesting challenge for me to learn too!
I hope you enjoy it and will have a go at making your own cute little face embroidery and will leave a comment with a link to a photo of it.=)
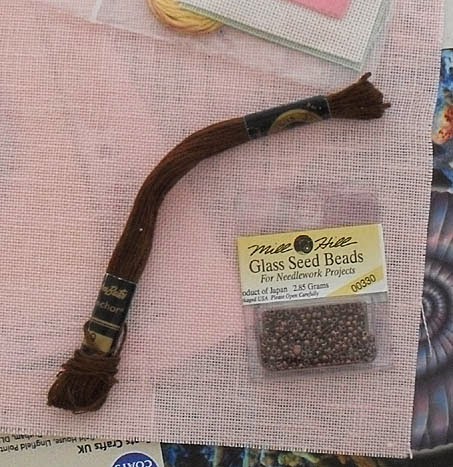
First of all, this piece was worked largely from one of the, sadly, deleted Coats 'Card It' kits. Here are the contents of that kit and, in the second photo, the changes I made to the colouring of the girl's face. This was to be a little congratulations card for my niece who got her good GSCE results last Thursday and she isn't a blue-eyed blonde, so I changed to brown thread and beads to match her more closely. (GCSEs are the national exams all English, Welsh and Northern Irish youngsters sit at age 16.)
Of course, you can do that with the skin tone as well. So, if you wanted to work an Oriental, Indian or black face, you'd simply select the correct shade of brown for the skin fabric and browns and black for the hair and eyes.
Mount your main background fabric into a small hoop. I used one just 10cm/4 inches in diameter.
Cut a 5cm/2inch circle from the contrasting fabric you plan to put behind the face and a 4cm/1½5inch circle from your face fabric. As you can see here, the kit used evenweave fabrics for all three pieces, but I don't see any reason why plainweaves won't work just as well.
Attach the contrasting fabric to the main fabric using random straight stitches and a co-ordinating thread.
Of course, this stage is optional as you don't have to have this contrast trim at all.
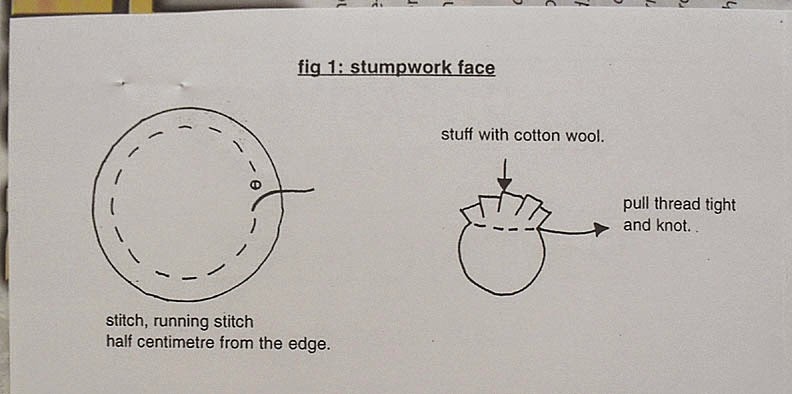
Now we move on to creating the head. Above are the instructional diagrams from the kit (which I thought were pretty good).
Using a matching sewing cotton, stitch a line of running stitches all around the face fabric circle about ½cm/just over ¼ inch from the edge. Make sure that you secure the thread well at the start with a knot.
Pull the thread up tight and, after having inserted a tiny bit of cotton wool or toy stuffing type material, secure the back well. Be careful not to put very much stuffing in, or else you could be dealing with an unnatural protruding face which will be hard to shape later on.
Using small stab stitches and a matching sewing thread, attach the stuffed face to the backing. Where you position it in the circle will depend on whether or not you want to put some lettering underneath and/or something on the head - a hat or, in this case, a crown.
When you've been all around the edge of the face, this is what it should look like. Don't worry if it's a little uneven. You can probably shape anything too odd looking with your fingers and/or a few extra stitches.
Next are the eyes. Take a beading needle and some matching sewing or embroidery thread and attach seed beads about a third of the way down the face. Eyes are about half way down a real face, but you may not want all that room above this for this cartoon-style face, especially if you want to add some type of headgear. If not, place them a tiny bit further down and bring the front hair down further too.
Try to make sure the beads sit well, (one of mine is a little skew...), and pull the thread quite tightly so that the beads pull the face in a little and give it more shape.
Using the same kind of well-pulled stitching, put in a mouth outline using small running and back stitches.
Take care not to pull too tight for either of these stages. You want to aim to create a little realism in the shape, not to have steep dips - or break the thread!
Now is time to start on the hair section. There's a lot of room for variety here, so experiment a little and use your imagination. Afro hair could be created with thicker threads, perhaps pearl cottons which have a good bit of twist and/or French knots. Here, long, straight stitches using three strands of regular floss were used.
Make sure you cover in the sides well by putting some stitches along the side of the head.
When you've more or less finished, have a good look at the face and see what needs to be adjusted.
I felt the the hairline at the left hand forehead part was a little too angular and my girl looked a bit pale. So, I put in some more stitches for the hair and, in proper womanly style - painted in her cheeks with a tiny bit of blusher on a small eyeshadow brush!! Apart from the bead that doesn't sit well (and makes her look cross-eyed - you could even do that on purpose, if you wanted to!), below is the finished face:
This kit was for a head with a crown on and a small piece of pink felt came with it to create that. I drew out a crown shape on the small square provided using the template in the instructions as a rough guide.
If you want to create a hat, you can use much the same method and cut the shape out of any suitable material: felt, leather, some low- or non-fray fabric, or even a more delicate fabric that you've stabilised by putting some iron-on interfacing or Bondaweb on the back of.
Stitch down the headgear shape using whatever colour and type of thread seem to best meet your requirements and with a size and quantity of straight stitches that you think will fit in with the look you want to create.
Add in some beads and trims as you like. On the crown, there were six beads to be spaced out along the bottom, which also removed the need to stitch down the bottom edge of the crown shape. If you do want to stitch down the lower edge of your headgear, take care not to pull too tight or the hat will look like it's squashing the head rather!
Each point of the crown had a start sequin with a bead on top too. Come up though both then go back down under the bead, but back through the sequin hole to secure the whole trim.
Above is the finished face with crown and below, complete with some lettering (which would have been better done in a darker shade!!) and mounted in a small, circular aperture greetings card blank.
What do you think? Could you manage to have a go at that? It only takes about 60-90 minutes to complete, so may be the perfect project for a 'me time' evening.=)
Text and images © Elizabeth Braun 2014


9 comments:
Oh my...
It is so beautiful, so precious.
What a wonderful idea! Congratulations to your niece.
Very cute...this is on my bucket list. Thanks for the tutorial.
This is so cute. I'm sure you're nice will love it :)
So beautiful :)
It turned out well - and yes, any plain weave fabric should work, if it isn't too heavy. Some of the plain patchwork fabrics might work, and they come in a whole range of colours that offer suitable skin-tones - even for green-skinned aliens!
This is so cute, I shall have to make at least one!
This is the cutest thing I've seen in ages. Thank you.
When I saw the review and instructions on the face with "Stump Work" I thought of my husband's 3 year old grand niece in a noisy church taking out a doll from her purse. The face on your work reminded me of her... Child has no idea what the grandmother wants, but she knows to keep very quiet and still. I believe I will make a small "church purse." With Stump Work face. Thanks! atk
Post a Comment